On the last day of September, in the middle of one of the most colorful and durable fall seasons, an inquiry email came from Barbra Butler. It turns out that she had a friend who came to the MCC Relief Sale in Goshen a couple weeks earlier, and mentioned seeing some work I had donated to the sale. She took a look at the website my son-in-law Danny made for me, and used the submission form to email me.
We discussed some questions on the phone and arranged for her and her husband Jim to come to the shop and check it out in person. The following Saturday, they took a 2 1/2 hour road trip to my home. We took a house and shop tour, looking at design ideas and construction techniques. It was a pleasant and rewarding conversation heading the same direction toward a desk and work station.
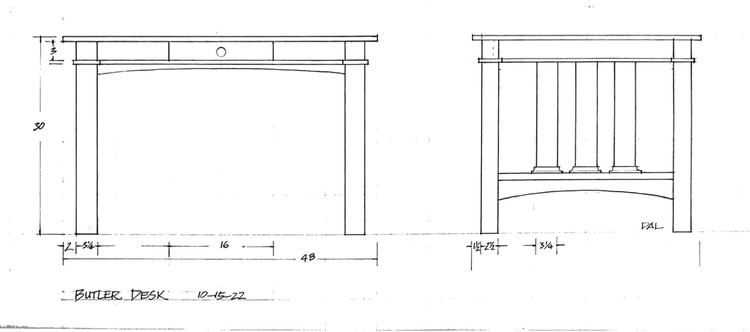
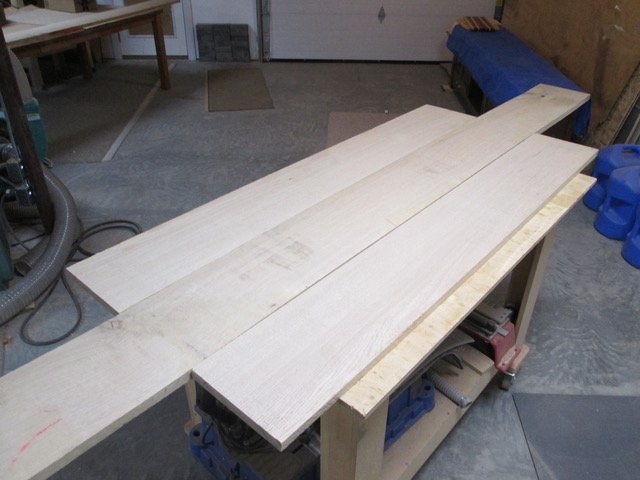
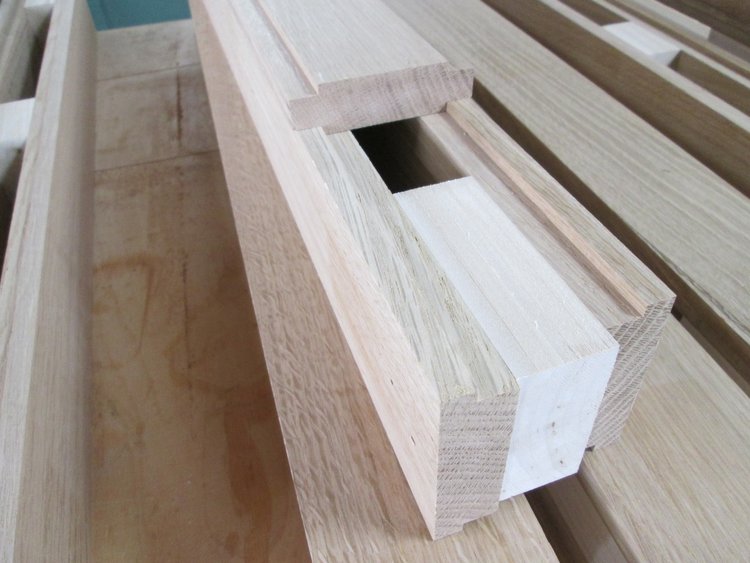
The first step was redrawing a desk that is on my short list of all time favorites, to meet the proportions Barbra was wanting.The first decision was the wood type and Rift Sawn White Oak was picked, for the most straight grain and least medullary ray figure. These 9-10 footers fit the bill perfectly.With the design and dimensions in my mind, I began laying out the pieces for the most important parts, the tops. For the 27 x 60 top, one wide board was able to be cut into two 60” halves and flank the middle in a most pleasing arrangement. The trio turned out to be 3/4” too narrow, so I spent considerable time with the other boards for another suitable match. In the end, nothing else struck my fancy, so I went with the eye over the tape measure.This is the lay out work on the shorter top, 30 x 48. The focus does not do justice to the harmony of arrangement which will show up as the piece comes together. These pieces are set aside to be sanded through a wide belt sander at my favorite wood supply, Nisley’s Sons in Goshen.Next was leg making. The heavier proportion called for dimensions not possible to find in Riftsawn White Oak, and it was not uncommon for the best of Prairie and Mission Styles to have hollow legs. In the past, I have used a 45 degree locking miter, but I wanted to have part of the middle solid for the best holding of the dowel joints. So I decided for a center fill of soft maple.After the sides were glued, a groove was routed out, and a cap piece made. This is to give the best grain match all the way around the leg.The caps were about 3/8” thick, so I used 7/8” support boards on each side. The Jorgensen clamps are 30 years old, and still pulling their weight with amazing strength.Here is the leg after some basic machining to dimension, with the caps on the sides. The difference between face and edge grain can be easily seen. However, it nearly disappears when the corner is routed with a 3/16” round over. Then the eye relaxes, and the hand is comforted with the sharp edge is gone. Next up, making skirt, cross pieces, slats and slat bases.