How to Apply Fiberglass Over Marine Plywood

With the boat upside down, it was time to put the outer covering of fiberglass fabric over the marine plywood hull planks. Glass fibers are very strong in tension and resistant to abrasion. When embedded in epoxy on the inside and outside surfaces, it creates a strong, stiff and relatively light weight composite structure.

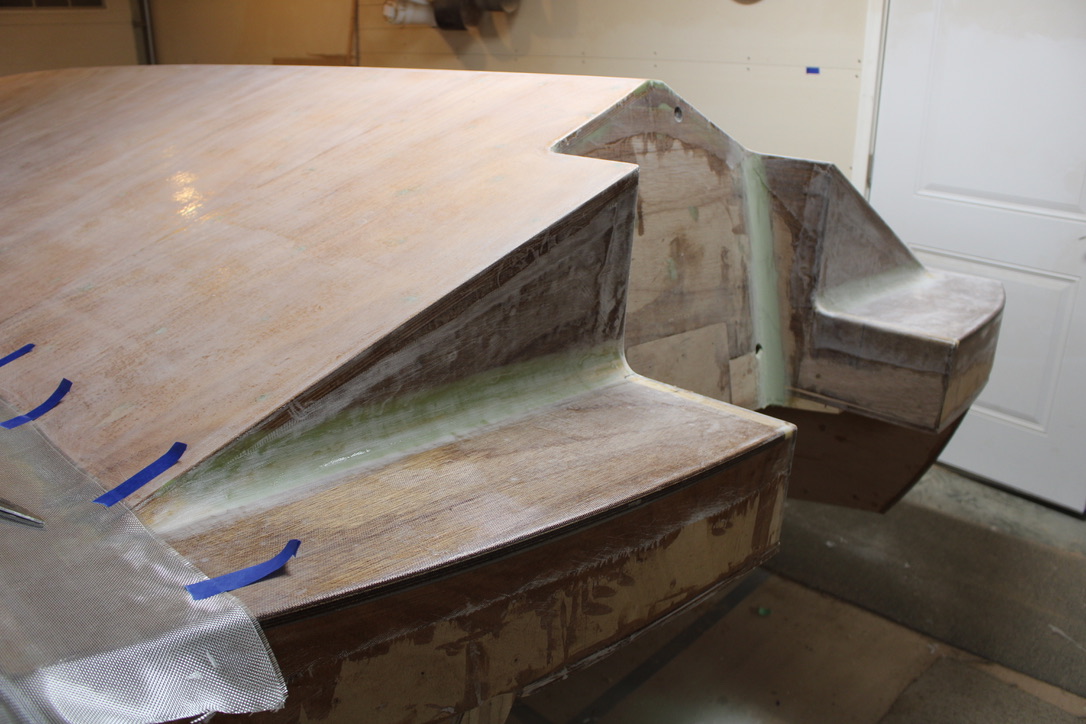
The photo below shows the hull bottom after placement of the glass fabric. The corners have been filled with a thickened two part epoxy filler that were sanded to shape. The back edge of the bottom surface was left as square as practical, for the most efficient water cutoff at planing speeds.

Experts disagree on two main methods of adding the glass fabric: laying out the fabric and then applying the epoxy or brushing a coat of epoxy on the wood first. Since the fabric catches on sharp or sticky things and deforms easily, I prefer to carefully lay it out over dry, sanded surfaces, primarily in one plane, as shown below.

A 36″ wide layer was rolled out and taped, overlapping the previous finished areas. With a smooth under surface, small changes can be made to smooth out wrinkles for the best possible fit.

The downside to this method is that the epoxy must penetrate the fabric, and fully bond to the wood underneath, or risk delamination later. The surface needs to be fully wetted and transparent, but not so much extra that would make epoxy flow zones. The application begins, rolling epoxy from top down, working out wrinkles as we go.

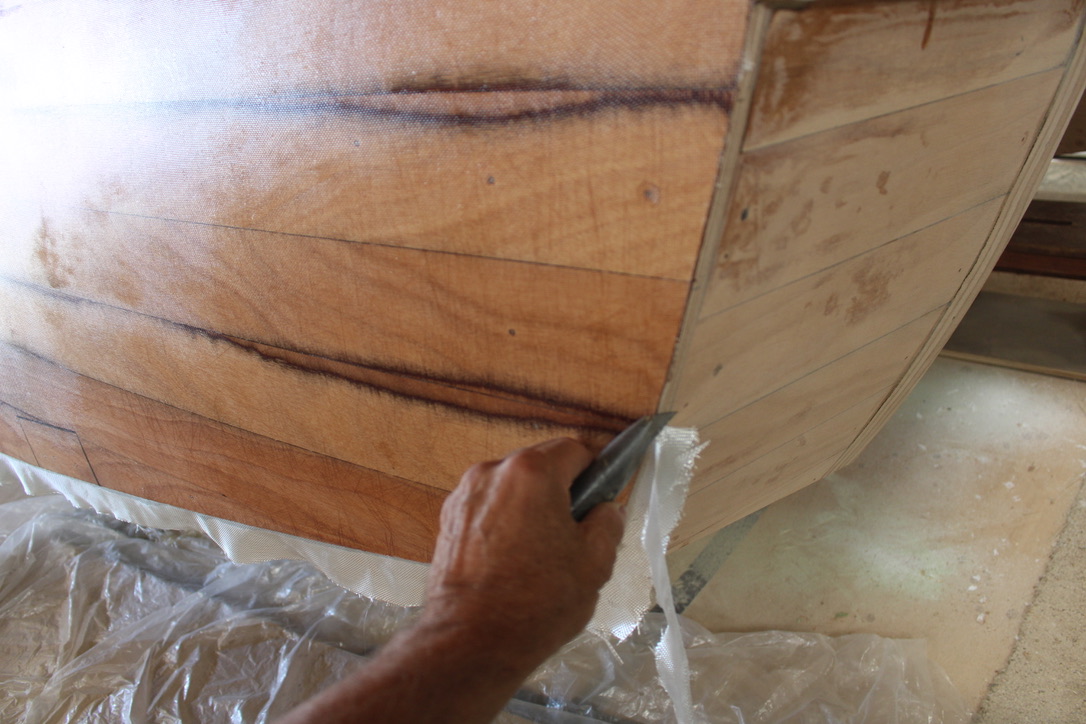
When the epoxy has set up to the stiff, not sticky stage, before it gets hard, the edges can be trimmed with a sharp knife.

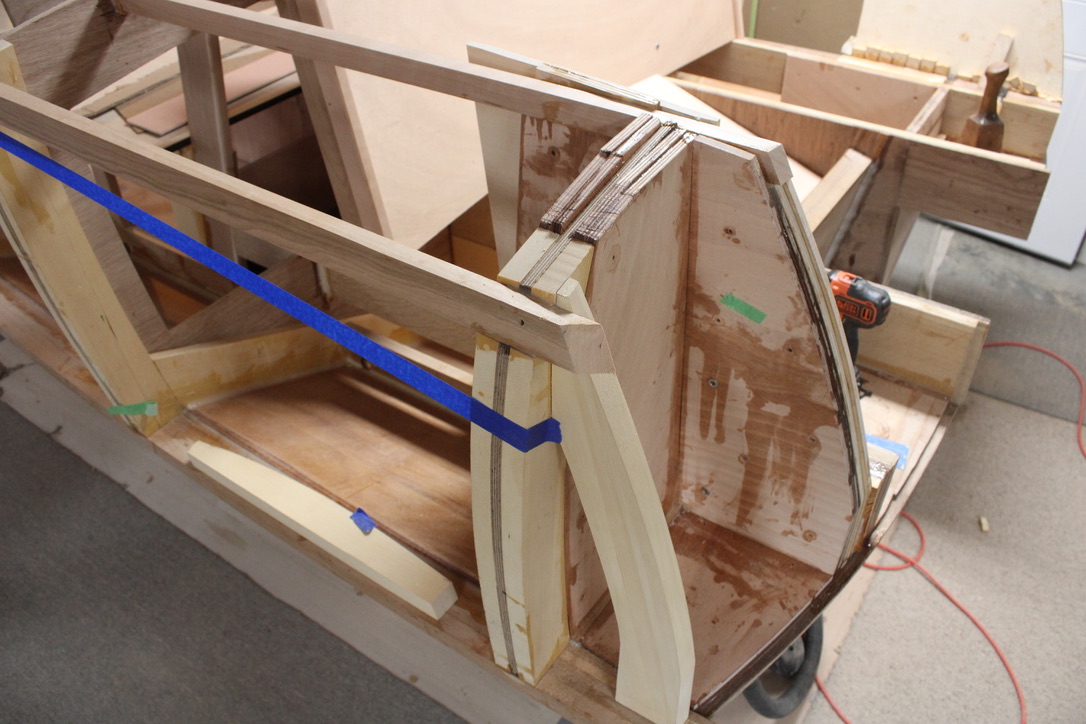
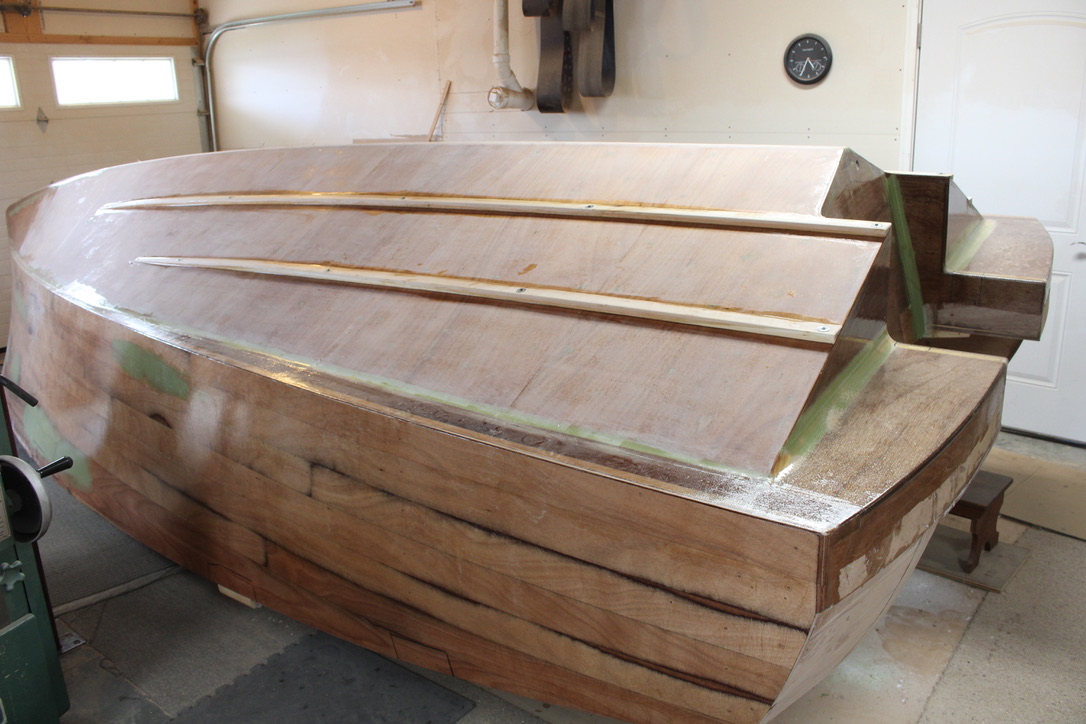
Next strakes were added, and rough sanding all over with 80 grit to allow best primer and paint adhesion. The hull planks of 4″ tongue and groove marine plywood show through on the sides. The dark lines show where the top ply layer was sanded through, and the green where low spots had been filled for final fairing.

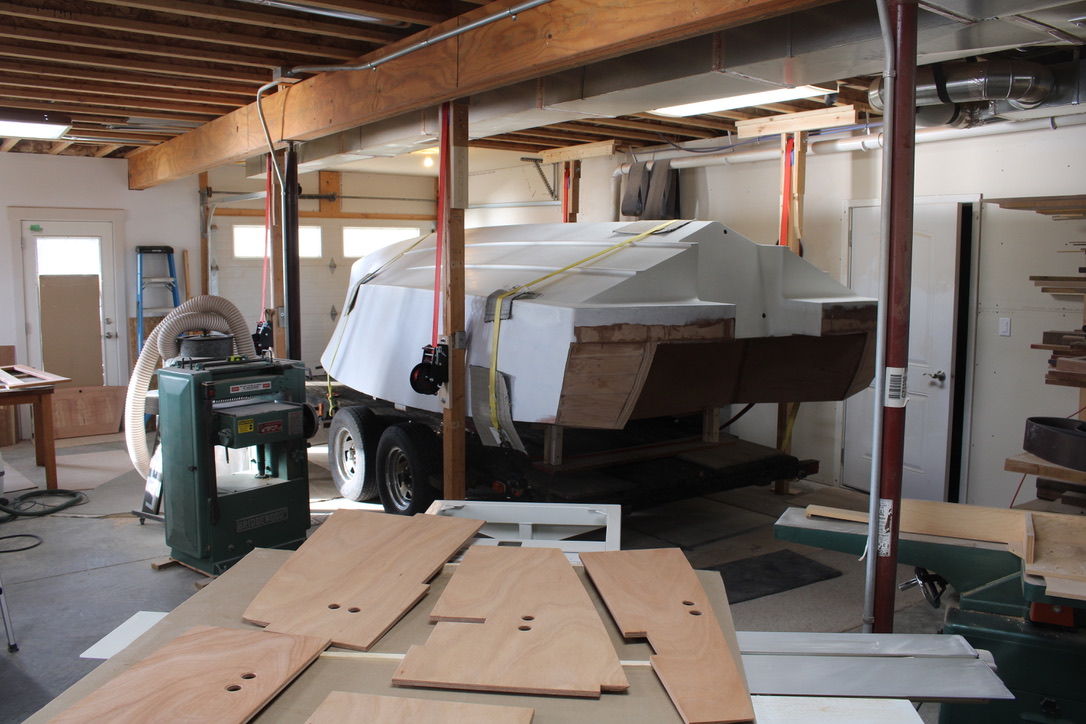
My shop is not equipped to spray paint , so the boat was loaded on a flat bed trailer and slowly hauled five miles to get professionally painted. This is on the return trip, preparing to lift the boat with the four heavy duty winches mounted on the temporary posts.

There are many ways to slow down a big project like building a boat, which happened but it is off and rolling again, passing this significant milestone. Work on the bottom is completed and following a final flip, this boat is intended never to be upside down again.

Optimizing Boat Transom Design for Better Motor Mounting

Transom Height Review

After what seems like endless days building the boat frame, shell and interior parts, it is high time to do the final engineering of the back, and close it in. When I started, the original plan was for an outboard motor with a 20″ vertical shaft, but I became concerned that the transom height was not far above where the water line will likely be.

Even though there is a separate back wall to the motor well, I did not want so much water to come over the transom as the boat slows down. Also, there was a concern that having the motor mounted lower to the water could allow water coming into the exhaust ports. So I needed to rebuild it 5 inches taller for the next larger motor size.

The 2.5″ thick transom was made by epoxy laminating five sheets of 1/2″ marine plywood, and then mounting it in grooves of the long beams. This is not a casual, glue a piece on the top, as this area needs to be strong enough to successfully hold a 500 pound motor and the push/pull that it provides. Not to mention that the most stressful time may be crossing a bumpy rail road tracks.

Routing for a Crossover Sandwich

So, i first clamped in some plywood scraps to make a temporary guide fence for the router, inside and outside.

This is the top view showing the areas cut out and the angle brace that connects the transom to the keel. Plenty of dust came from routing the sides.

Here are the sandwich sides prepared to hold the new transom extension, which was made to fit down into new grooves on the sides. Overlapping wood parts gives the most epoxy gluing surface area and mechanical strength.

Corner filler pieces were added and then the assembly was biscuit joined to a strong piece of white oak to cap it off. Finally, I drilled a bunch of shallow holes with my Forstner bit so when the thickened epoxy attaches the parts, it adds strength in an imitation of many dowel holes.

This is probably the expression of a tendancy of mine that lead coworkers at Swartzendruber Hardwood Creations to think that sometimes my work was a bit “overkill.” Maybe, or maybe not, but in on the back of the boat, I can live with the chances.

The transom was done, and next up was building the internal support for the ladder going next to the repaired transom. With the improved height of the transom, and ease of getting on and off the boat, it should be better performing and more useful also.

Building a boat is a lot like climbing the Lake Michigan dunes, a short step up and a slide half way back. But where would you rather be than watching the grandchildren explore, jump off the cliff, run full speed down, occasionally tumble, with maybe a bit of sand in the mouth. Nothing that a hotdog won’t wash down.

Hull Planks and Contours

With the boat turned upside down the last time, the side planks need to be installed. They are made of 1/2″ marine plywood, cut into 4″ planks and routed with a tongue and groove to fit the best side by side. I alway start dry fitting a group, to see if the underlying cross frames are supporting fair curves.

In this case, I will not be doing the last few rows until the boat is flipped over and I can make sure the shape at the top line is good. But most of the side needed to be done in preparation for final painting of the bottom. Jeff Margush lends a hand, actually you could probably make the case that he might be doing the work mostly by himself.

After the epoxy dried, I needed to shape the plywood plank down to meet the longitudinal corner molding, called the chine. This Okume Marine plywood is the best plywood I have ever worked with, being almost as easily planed as solid wood. It is a woodworkers delight to have these wood curls roll up from a sharp blade in a good plane, especially the ribbons below.

After doing whatever wood removal is needed, then it was time to add some epoxy fairing compound to smooth gaps and add nice fillets to the corners. Between a rasp, a scraper, coarse sandpaper with flat or rounded blocks, and a dust brush, slow progress can be made. The proof will be in the pudding of a shiny paint job, to see if the contours are good.

A bit more fairing on the sides, finishing the bow and stern contours, and it will be ready for the next nerve racking step: putting a huge sheet of the glass fabric on and trying not to repeat the snafu that happened last time. Too much epoxy over a complicated surface ran and pooled in an ugly mess, that required many hours of scraping and sanding. This time I know what I am doing?

Building a boat seems like a continual learning project, and hoping not to have to repeat too many steps. Sounds like life . . .

Under the Surface

Before the hull planks go down and create the beautiful curve shapes, the interior frame work has to be ready for the hard work. The boat must be built strong enough to be lifted by three points, one in front and two from each side of the stern. It would be a grand shame to see the boat chained and raised off the temporary trailer, and watch it drop from a failing U-bolt. 

The same area in the back will also needs strength to hold a ski/tube rope, and tie downs to the trailer when traveling.

The top of the back cross frame has been cut off to make room for the motor well, but the remaining C-shape sides are the most obvious place to begin building strength.  

More plywood layers were added on the inside and out, connecting the top and bottom to make a strong outer panel. They are bonded with epoxy which is very tough and does a better job of filling gaps than most other glues. 

If I had planned perfectly, the outer longitudinal beam would have been right up against the glued layers. But instead, the deck needed more space for the folding ladder, so I had to add some filler layers.

To fill the gap, I epoxied the marine plywood blocks to the long beam. The speckled markings are shallow holes drilled to allow the epoxy to grip a deeper layer, and resist a shear sliding force.

Next, another plywood panel was constructed beside the longitudinal beams. It is beginning to show the 3D shape of the stern extensions.

This is the group of eight plywood pieces that went into making the left (port) side wall. The right side was about the same. It did get a little complicated. The morning that I planned to glue both sides turned into a whole afternoon and made me late for supper.

Since the middle wall was slanted out, in the way that looked best to me, I had to make some perfectly angled wedges to glue in the gap.

They were made from a Douglas Fir 2 x 6. By angling the cross cut fence and flipping the board over each time, eventually I found an angle that worked great. 

Since the wedges were cross grain, when I applied the epoxy, it soaked in to the large pores and (I believe) became a very strong wood and epoxy link. 

If this was a production boat, I suppose some testing would be in order to see if my seat-of-the-pants engineering worked out. Especially since the last time I took the 2016 wood boat to the dealer for motor service, they told me that the transom was cracking.

Now this was a surprise, because it has always been a concern. I do inspect on occasion to see if that last big wave or the bumpy railroad tracks, may have crossed the limit of the transom’s strength. So, I asked the mechanic to show me the problem area, and he pointed out some cracks on the back stern panels , not really a part of the motor mount area. 

It is annoying but fortunately not serious, as the issue is sun damage. The mahogany veneer is developing small cracks because it was less protected under the boat lift canopy. So, with no major engineering failure on the previous boat, I take it as my cue to carry on. Inspectors Jeff Margush, Don Florea, and Andrew Alger will be relied upon to set me straight.

The stub cross frame now has five half inch marine plywood layers, and the longitudinal panel has three layers.

Slowly, slowly, the work on the inside frame is getting done. It gets tedious, and without glamour, to put some pieces in place that soon will never be seen again. But when the big waves and bumpy road comes to stress the pretty boat shell, what’s inside gets much more important and obvious. It is like a life well built. 

Routing Detour

A two or three year boat building project invariably gets interrupted in all sorts of ways and the current detour is a desk I am working on. I was cutting the dovetails for the drawers, with my special dovetail routing system. It usually starts with cutting the tails on the bandsaw. The plywood guide has a thin wood piece attached to the bottom that slides in the slot on the metal saw top. It is marked with 8 degree pencil lines to lay the board for cutting at the correct angle.

After the outer cuts are made, a little more work is needed with the bandsaw or chisel, to remove the waste between tails. Then, it gets clamped to the router jig for marking the pins with my trusty pocket knife.

After that, it is moved to the front of the jig, and clamped flush with the top.

The sliding table sides are moved exactly to the pocket knife marks (not easy to see here) and clamped in place.

The router is then set to the correct height for the width of the drawer side, and it is ready to roll. Normally for through dovetails, I cut all the way to the back fence. 

If all goes well, the router does a quick and accurate job of taking out waste.

Checking the fit should look like the example below, and quite frequently does.

When I want the dovetails not to be seen as on the front of some drawers (half-blind), I use a spacer against the back fence to stop it short. It was going well except for one cut, and I forgot to put in the spacer to limit the router travel. Of course, this was the last step in the drawer construction, and of course, it was the last drawer corner I was cutting. 

Haste makes waste, and when I felt the router going all the way to the back of the jig, I knew I was in trouble. Sure enough, I routed right on through the drawer front, making the big hole below. 

I considered starting over but didn’t have the right size wood, the time, or as I heard one college summer in construction, “It ain’t a church.” Angled or curved repairs are much easier than a square cross grain fix, so I had to look carefully for a scrap piece that had some end grain to match pretty well.

I bothered to fit the piece as well as I could to line up the grain. After gluing and sanding it flush, it disguised well enough not that I decided not to mention it to my “client,” my grandson. He had been helping build the desk for himself, but was not present at this step. 

I rather doubt if he will notice the repair right away. But, some day when some random thing goes wrong for him, I will ask if he has noticed the mark on the drawer front. 

Now, I wouldn’t trade the drawer for a perfect one. It becomes the enduring story of how life goes, when what was hoped for does not happen, and must be worked through with creativity and perseverance. It is a life lesson waiting to happen . . .